
Blog updated – 6th June 2013
The beginning and end of a lesson are undoubtedly important phases of learning. In the first 10 minutes of the lesson you are looking to engage students, elicit their prior knowledge and set the scene for the learning that will happen over the next hour or so. And then at the other end, the last 10 minutes seek to assess what learning has happened and what hasn’t quite stuck and may need some extra attention.
So, how to do it? The answer of course is in many different, innovative and creative ways. Here’s a few ways that are simple, effective and reproducible.
1) A visual hook
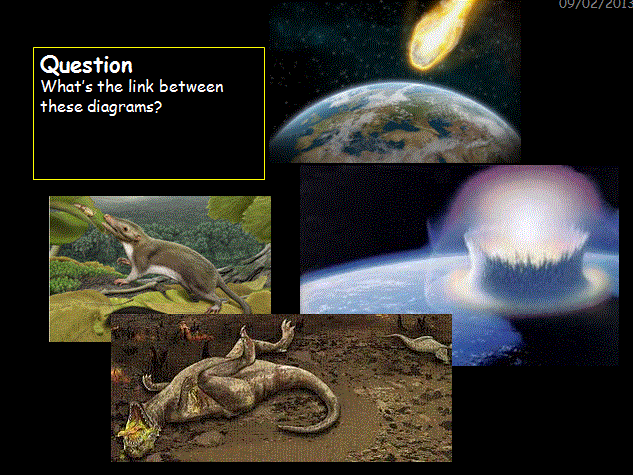 Use a series of visuals to stimulate discussion. In this example, pictures of an asteroid hitting the earth, dead dinosaurs and then small mammals thriving are used to generate discussion on the extinction of dinosaurs and the impact that this had on the mammals. This strategy is great for reducing teacher talk and encouraging students to activate their prior knowledge. It will also raise lots of questions that you can come back to during the lesson (post-its on the board)
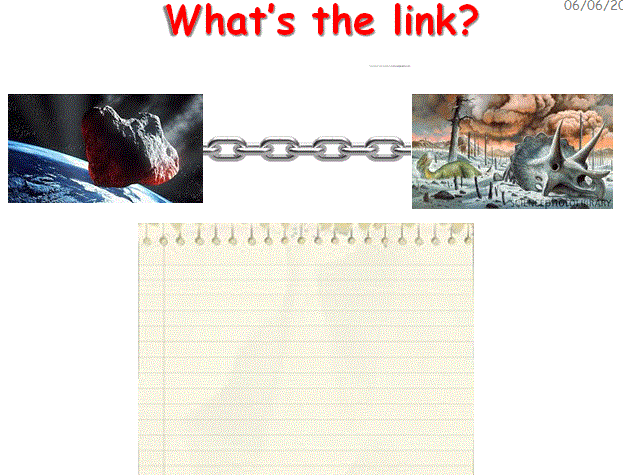
In a similar way, students can be shown two images (here a meteorite and dead dinosaurs) and are then asked to write a paragraph that links them together.
Again, this is a good way to generate discussion amongst students.
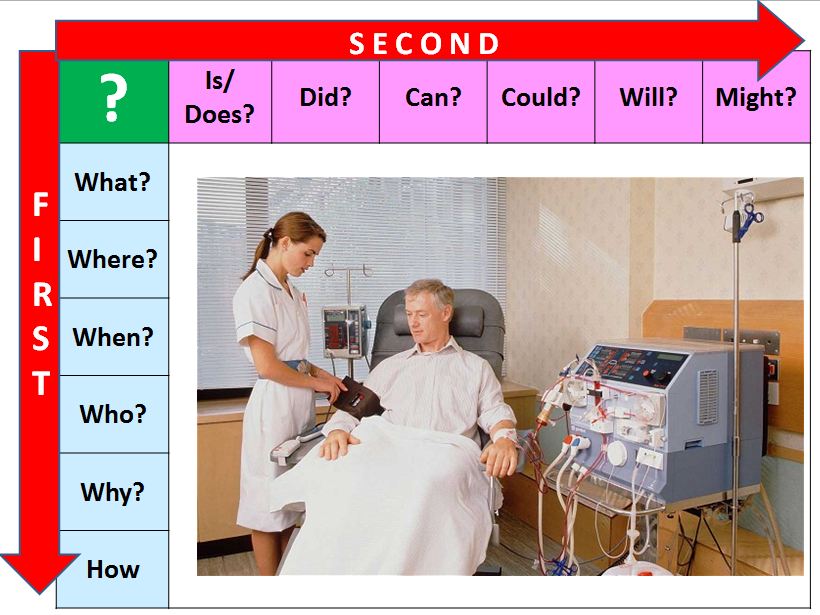 The brilliant @JOHNSAYERS produced this great resource – the question grid.
Excellent for the start of lessons, students can be given a visual prompt (the photo in the middle). They are then asked to come up with questions, using the prompt words in the red arrows, that they would want to ask, to find out about what is going on in the photo.
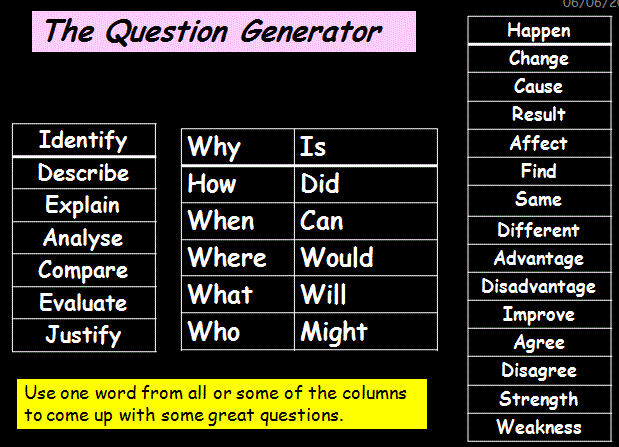 The idea of getting students to come up with their own questions can be further developed by using this ‘Question Generator’. This can be used in a variety of ways e.g. at the start of the lesson to come up with questions they want to find the answer to, or at the end to come up with questions for each other – or perhaps for further research at home. Lots of possibilities.
2) Setting out the learning
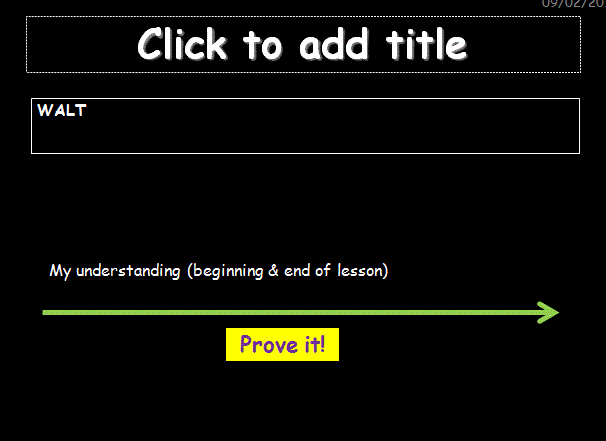 A simple slide like this one can serve many purposes. Firstly and most obviously it states the learning objectives for the lesson (WALT – We are learning to). This should be discussed and unpicked with students – but avoid the temptation to ask them to copy it down! This serves no learning purpose. The green arrow can then be used by students to plot on there (with a cross) how much they know about the learning objectives already. Again, another great prompt for discussion. They could sketch this in their book, or have a big one the board that they all contribute to. Be creative!
I have seen a number of teachers add to this by including other skills that will be developed in the lesson e.g. specific exam technique skills, literacy skills etc.
Then of course, come back to the arrow throughout the lesson and at the end of the lesson . Where is their learning now? Get them to re-plot their learning along the line and look at their progress. This is where the ‘Prove it!’ box comes in! Don’t allow them to randomly put a cross on the right hand side of the arrow and claim they have made massive progress – simply to please you! Get them to prove their progress – through questioning, showing/discussing their work etc.
It’s worth pointing out a few things that are often seen at the start of lessons – that aren’t always that helpful:
- Copying down learning objectives – a passive activity with very little purpose.
- All, most, some objectives – stifles expectations. Instead of this, have challenging learning objectives and differentiate up, so all students are expected to achieve.
- Anagrams and word searches – again, very little learning involved here – just letter recognition!
3) Reviewing Learning
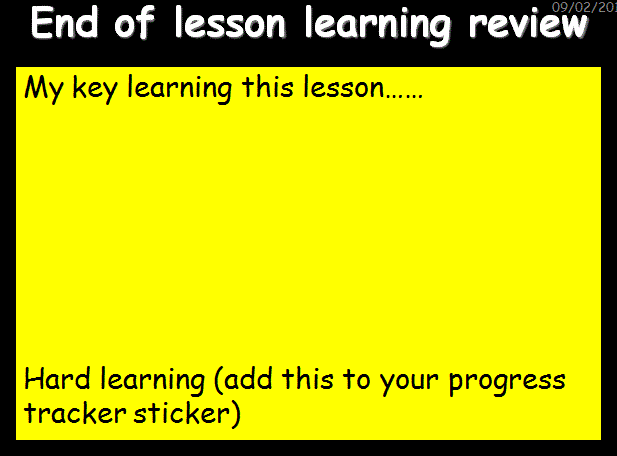
So having proved their progress along the green arrow, they can use an ‘exit ticket’ like the one above to summarise what they have learnt in a few bullet points. However, in order for them and you as a teacher to know what they need to work on further, get them to identify the ‘hard learning’ – what they are still stuck with.
At our school, they then write this on their ‘Progress Tracker Sticker’ on the front of their books – so they know what they need to focus on, in each subject in order to meet their target grade:
![]()
The progress tracker sticker also allows you to ‘close the gap’ with your marking. When they have achieved the ‘hard learning’ identified on the sticker, you can initial and date it on the sticker.

The ‘Learning triangle’ can also be used at the end of the lesson.
Students use it to identify what they already knew, questions they still want answered (to inform future planning) and then things they have learned that lesson.
 ‘Plenary Prefects’ are a great way to get students involved in assessing the learning that has taken place during the lesson. Give one or two students one of these cards at the start of the lesson and tell them that they will have to think of questions to lead the plenary at the end of the lesson.
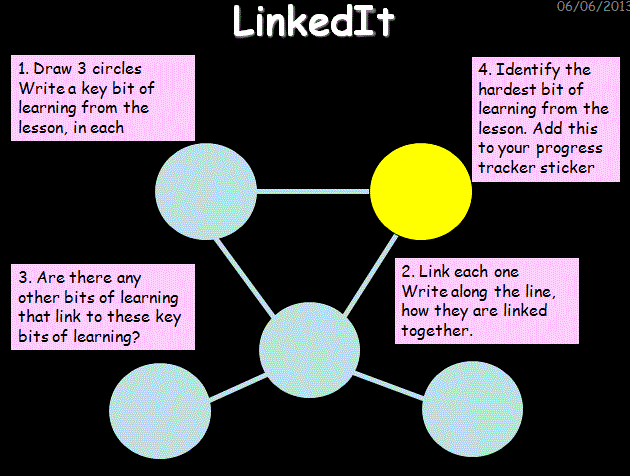 ‘LinkedIt’ is a good strategy to use at the end of the lesson – when there has been a number of linked ideas and concepts.
Students start off by writing three ideas and then link them together. They can then start to think about linking other ideas to these 3 main ideas.
Again, a few common mistakes made by teachers at the end of lessons
- Not leaving enough time for an effective review of learning
- Telling them what they should have learnt, instead of eliciting this from them.
- Asking one person what they have learnt and then assuming everyone else has made the same progress.
- Rushing to get through everything on the lesson plan, rather then ensuring that the learning is in depth.
Whilst none of these strategies are necessarily ground breakingly new, when put together they do provide an easy and effective way to look at learning in, through and out of the lesson. Hopefully they’ll provide a stimulus for lots of other brilliant ideas.
Templates for these slides can be downloaded here


Pingback: The Big Idea – Questioning | Class Teaching
Pingback: Class Teaching | Sharing best practice in secondary teaching and learning « The Road to RIO
Pingback: Some thoughts on questioning….. | Class Teaching